Custom Plugin
VA Framework is built on top of Plugins and Workspace nodes. Developers either customize and create conversation flow by connecting nodes in Oryzer Studio or develop complex behavior by creating custom plugins that are imported into the application.
A plugin is a simple class library that is loaded by VA Framework upon launch. In order to create a plugin you'll need to import Syn.VA Framework into your project. A Plugin must meet the following requirements to be successfully loaded into the application.
- Target .NET 4.6.1 and above
- References
Syn.VAframework - Must have at least one class implementing
AssistantPluginclass.
Creating Plugin library
To create a WPF User Control Library in Visual Studio following the steps given below.
- Start Visual Studio 2019 or above
- Select Create a new project and choose WPF User Control Library
- Click Next
:video videos/create-wpf-control-library.mp4
- Name the project Syn.VA.Plugins.HelloPlugin and choose Create.
Import Syn.VA
To import Syn.VA framework to your current project you can:
- Right click Reference in Solution Explorer
- Choose Manage NuGet Packages...
- Select Browse and type
Syn.VA - Click on Install and the package will be installed to your project.
You are now ready to create your plugin as all required dependencies have been imported into your project.
Inheriting AssistantPlugin
VA Framework scans the plugins directory for class libraries. Each library that has at least one class inheriting the AssistantPlugin class is then loaded into the application.
Let's create a class called HelloWorldPlugin and inherit the class from AssistantPlugin as show below.
namespace Syn.VA.Plugins.HelloPlugin
{
    public class HelloWorldPlugin : AssistantPlugin
    {
        public HelloWorldPlugin(VirtualAssistant assistant) : base(assistant)
        {

        }

        public override T GetPanel<T>(params object[] parameters)
        {
            //Required if the plugin does not have any editable settings.
            return null;
        }
    }
}
VA Framework uses the DisplayName property of a plugin to display it within the Settings Panel. We'll now go an assign Hello Plugin as the display name.
namespace Syn.VA.Plugins.HelloPlugin
{
    public class HelloWorldPlugin : AssistantPlugin
    {
        public HelloWorldPlugin(VirtualAssistant assistant) : base(assistant)
        {
            //Name to be displayed in Settings Panel
            Display.Name = "Hello Plugin";
        }

        public override T GetPanel<T>(params object[] parameters)
        {
            //Required if the plugin does not have any editable settings.
            return null;
        }
    }
}
The above plugin does not do anything at the moment but will still be loaded as a valid plugin. Let's add functionality via Actions
Add a new class called HelloWorldDialog and inherit it from Oscova's Dialog class as shown below. Then create a new void method and use the Action attribute to decorate the method and specify mymessage.hello.show as the ID.
using Syn.Bot.Oscova;
using Syn.Bot.Oscova.Attributes;
using System.Windows;

namespace Syn.VA.Plugins.HelloPlugin
{
    public class HelloWorldDialog : Dialog
    {
        [Action(ID ="mymessage.hello.show")]
        public void SayHello(Result result)
        {
            MessageBox.Show("Hello World!");
        }
    }
}
The above code creates a new action that can be called via Composer. When called the VA would simply show a message box with the string Hello World!.
You can also pass parameters to Actions in Composer. For this use the ActionParameters property on the Context returned and specify the name of the parameter you are looking for. If the parameter was passed it's value will be available else an empty parameter instance is returned.
using Syn.Bot.Oscova;
using Syn.Bot.Oscova.Attributes;
using System.Windows;

namespace Syn.VA.Plugins.HelloPlugin
{
    public class HelloWorldDialog : Dialog
    {
        [Action(ID ="mymessage.hello.show")]
        public void SayHello(Result result)
        {
            MessageBox.Show("Hello World!");
        }

        //Action with a parameter.
        [Action(ID = "mymessage.show")]
        public void SayMessage(Context context, Result result)
        {
            //Get the value of the parameter "message"
            var messageParameter = context.ActionParameters["message"].Value;
            MessageBox.Show(messageParameter);
        }
    }
}
To make load this dialog on startup (when the plugin is loaded) ensure that you add a instance of the dialog in the plugin constructor as show below.
namespace Syn.VA.Plugins.HelloPlugin
{
    public class HelloWorldPlugin : AssistantPlugin
    {
        public HelloWorldPlugin(VirtualAssistant assistant) : base(assistant)
        {
            //Name to be displayed in Settings Panel
            Display.Name = "Hello Plugin";

            //Add the Dialog with actions.
            assistant.Bot.Dialogs.Add(new HelloWorldDialog());
        }

        public override T GetPanel<T>(params object[] parameters)
        {
            //Required if the plugin does not have any editable settings.
            return null;
        }
    }
}
Now when the plugin is loaded, it's display name will be set and the HelloWorldDialog will be added to the bot's Dialogs collection. This will ensure our Actions available for execution.
Plugin placement
Once you've successfully build the Syn.VA.Plugins.HelloPlugin project. The project will generate a Syn.VA.Plugins.HelloPlugin.dll file in the Release folder.
To find the generated file:
- Right click the Project in Solution Explorer
- Select Open Folder in File Explorer
- Navigate to
bin/releasefolder - Copy
Syn.VA.Plugins.HelloPlugin.dllfile
After you've copied the file we'll have to place the file in the Assistant/Plugins directory of VA Framework.
- Open Settings Panel
- Select System and
- Click on
Open Working Directoryto open the Assistant directory. - Navigate to
Pluginsdirectory - Paste the
Syn.VA.Plugins.HelloPlugin.dllfile.
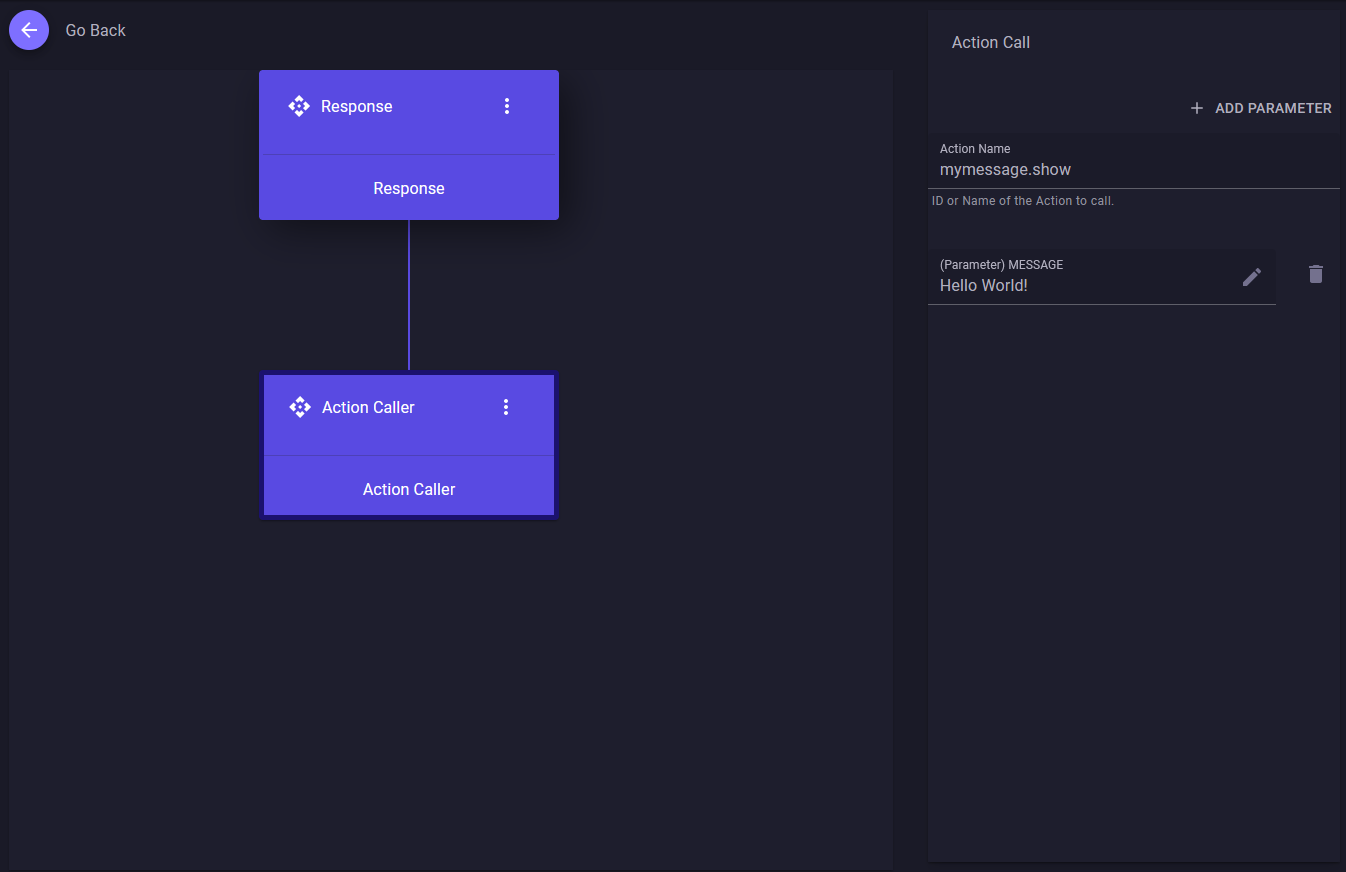
To use the action in Composer simply add a Action Call node and specify the name of the action. For this tutorial, we'll call the mymessage.show action and pass the message parameter.
Testing
To test the plugin simple run VA Framework and type Hello Plugin and you should see a message box saying Hello World!
You've now successfully built your first VA Plugin.